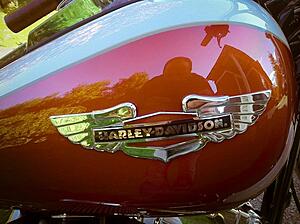
How to: Remove & Replace Tank Emblem on a Deluxe
#1
 10-18-2012, 06:47 PM

This little tutorial probably applies to most late model Harleys, but I did this one on a Luxe.
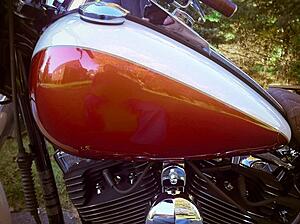
Before:
I just used some 20 lb test fishing line to zip through the adhesive behind the emblem. Because fishing line is plastic and softer than the paint surface you don't have to worry about scratching the tank. It really only takes a minute or so for each side - if you keep the line moving the heat from friction will melt the adhesive backing as you go - if you stop, the line will stick, possibly melt and break. So keep it moving and try to stay as close to the tank as you can when you do this because you'll leave a lot less residue behind for the next step.
Emblem gone, adhesive remains:
To get rid of the remaining junk, I just used a cheap red shop rag, some WD-40 and some patience. When I got it all off, I wiped the tank sides down with some denatured alcohol to get it clean so the emblem adhesive will stick properly.
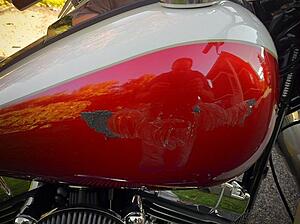
Badgeless tank:
I was tempted to leave it just like that!
Tankless badges:
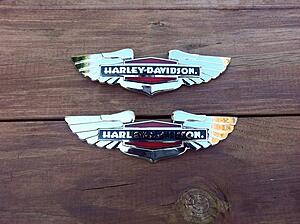
Hey, I've really got nothing against the stock badges, but the new early 60's panhead emblems just look **** IMHO.
New Emblems:
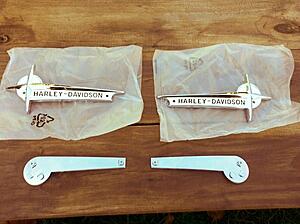
The way it goes is, you take the adhesive plates and put them roughly where the emblem will go - make sure they curve properly to make full contact with the tank. Bend them if you need to, they're a soft metal so it's easy.
Check-fit the plates:

Now screw the adhesive plates to the emblem, but don't tighten the screws all the way down to make sure all the adhesive sticks out further or is flush to the emblem base. Leave the tape backing ON, use some blue painters tape to keep the screws from backing out and some extra to position the emblem on the tank where you feel it looks best.
Mock up:
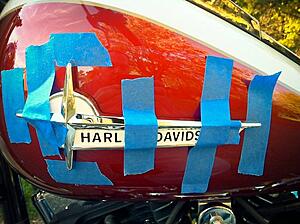
Once you have it positioned, slide some tape under at least a couple points that won't be under the adhesive and mark where the emblem hits for an alignment reference. Then just pull the badge back off, remove the tape and adhesive backing, and carefully apply the badge by using the alignment marks you left on the tank. Just go slow and try to press it down from one side to the other instead of slapping it down flat which could trap an air bubble. Tighten down the screws the rest of the way to suck the emblem down onto the adapter plate - remember to use a little blue loctite to keep them from backing out.
One side done:
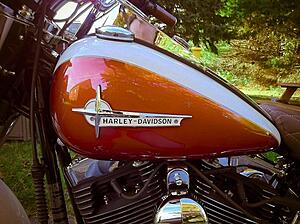
When I did the other side, I took a couple measurements off the previous one using the pinstripe as a reference point I just transferred the measurements to the other side and marked them with tape and a pencil. Then I repeated the procedure for the previous side but being much more careful to make sure both are aligned properly. I looked at it from about 150 different angles to be really sure - I found that sitting on the bike as if I was riding and looking down at them gave me the best alignment perspective.
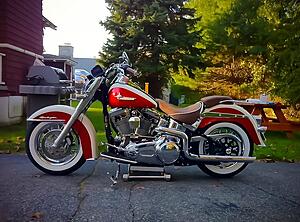
Both sides done:
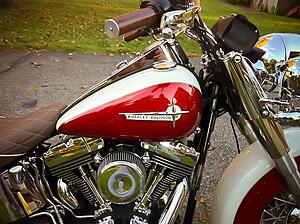
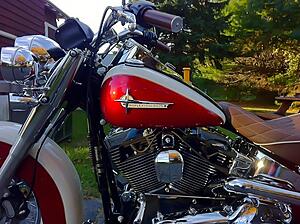
After all that I cracked a beer, re-waxed the tank a bit, admired my work and went for a ride. Later!
BTW, if you have a jack, use it to straighten up the bike so you're working on it level. After I tape positioned the first badge, I made sure to let the bike down to make sure it still looked correct and it didn't - eventually I set the jack just enough so that most of the weight was on the tires so I could tell if the bike was sitting properly in relation to the badge position.
Before:

I just used some 20 lb test fishing line to zip through the adhesive behind the emblem. Because fishing line is plastic and softer than the paint surface you don't have to worry about scratching the tank. It really only takes a minute or so for each side - if you keep the line moving the heat from friction will melt the adhesive backing as you go - if you stop, the line will stick, possibly melt and break. So keep it moving and try to stay as close to the tank as you can when you do this because you'll leave a lot less residue behind for the next step.
Emblem gone, adhesive remains:

To get rid of the remaining junk, I just used a cheap red shop rag, some WD-40 and some patience. When I got it all off, I wiped the tank sides down with some denatured alcohol to get it clean so the emblem adhesive will stick properly.
Badgeless tank:

I was tempted to leave it just like that!
Tankless badges:

Hey, I've really got nothing against the stock badges, but the new early 60's panhead emblems just look **** IMHO.
New Emblems:

The way it goes is, you take the adhesive plates and put them roughly where the emblem will go - make sure they curve properly to make full contact with the tank. Bend them if you need to, they're a soft metal so it's easy.
Check-fit the plates:

Now screw the adhesive plates to the emblem, but don't tighten the screws all the way down to make sure all the adhesive sticks out further or is flush to the emblem base. Leave the tape backing ON, use some blue painters tape to keep the screws from backing out and some extra to position the emblem on the tank where you feel it looks best.
Mock up:

Once you have it positioned, slide some tape under at least a couple points that won't be under the adhesive and mark where the emblem hits for an alignment reference. Then just pull the badge back off, remove the tape and adhesive backing, and carefully apply the badge by using the alignment marks you left on the tank. Just go slow and try to press it down from one side to the other instead of slapping it down flat which could trap an air bubble. Tighten down the screws the rest of the way to suck the emblem down onto the adapter plate - remember to use a little blue loctite to keep them from backing out.
One side done:

When I did the other side, I took a couple measurements off the previous one using the pinstripe as a reference point I just transferred the measurements to the other side and marked them with tape and a pencil. Then I repeated the procedure for the previous side but being much more careful to make sure both are aligned properly. I looked at it from about 150 different angles to be really sure - I found that sitting on the bike as if I was riding and looking down at them gave me the best alignment perspective.
Both sides done:


After all that I cracked a beer, re-waxed the tank a bit, admired my work and went for a ride. Later!

BTW, if you have a jack, use it to straighten up the bike so you're working on it level. After I tape positioned the first badge, I made sure to let the bike down to make sure it still looked correct and it didn't - eventually I set the jack just enough so that most of the weight was on the tires so I could tell if the bike was sitting properly in relation to the badge position.
Last edited by Knucky; 10-19-2012 at 08:29 AM.
The following users liked this post:
kikig2150 (04-18-2019)
#2
10-18-2012, 07:14 PM

Join Date: Mar 2006
Location: Northwest of Los Angeles
Posts: 18,057
Received 23,633 Likes
on
5,229 Posts
#4
10-18-2012, 08:03 PM
#7
10-18-2012, 08:37 PM
Seasoned HDF Member